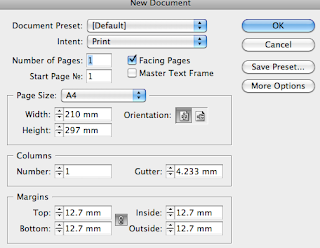
- Use the Column, Margins, Bleed and Slug for guides.
- Gutter = Space between columns
- Bleed = Space around document to give a margin of error (useful when trimming etc) Standard bleed is usually 3mm
- The Slug margin is larger than the bleed because it's commonly used for printer registration marks or colour swatches etc.
- Facing pages = pages laid out next to each other in a spread (Usually for a book)


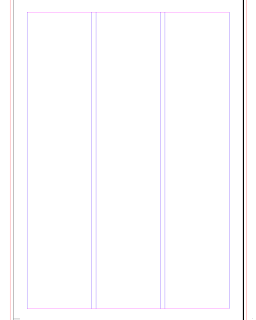
Black lines - Edge of Page
Blue lines - Column Margin
Red lines - Bleed Guide

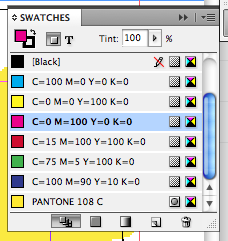
Creating a box and applying colour with the colour swatch palette.
When bringing images into Indesign you'll most likely be using Photoshop, the normal resolutions usually 300DPI, Save the image as Actual size and either as a PSD document or TIF file. CMYK (Printable colours) or greyscale.
When using Illustrator, CMYK or Greyscale, save as AI file type.
It's more efficient if you keep all the imported images in one folder. Because INDESIGN will need to locate these images when you come to print.
By pressing 'W' the guides are lifted, giving you a print preview.


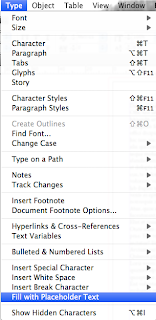
In order to view images at the correct resolution select...
View // Display Performance // High Quality Display
Window // Text Wrap
Adjust values to add space around the image and to separate from the text.

Appropriate to save as a PSD: When you're opening the document up at a later date, & intending to work on different layers.
Parts of a layer can be transparent whereas some could be opaque. (Background layers that are locked do not support transparency.) You need to double click and unlock the layer for further development.
Checkboard represents TRANSPARENCY.
Appropriate to save as a TIFF: When your designing for print or something commercially useable, do not save a TIFF file with layers (This is a new feature to the file type, therefore other software might not support the new addition.)
Contour options: Using 'Alpha Channel' this means to use the transparent sections of the image, this defines what is opaque and what is transparent. Aligning text around the border of the image, this can be adjusted for example; the spacing of text from the image, this is often used to increase the readability of a document.
We were given the task of reproducing a magazine layout...


Text frame options, It's possible to take one text frame and make it into multiple columns.
The text frames are all similar to Vector shapes in Illustrator. Instead of using a rectangular text frame, you can select the 'Direct Selection Tool' to alter anchor points and create a new shape.
You can directly manipulate images through In-Design, using the Effects Palette >> Select the drop down menu displaying the blend modes >> If you select the image and then choose 'Multiply', it will make the background Transparent. This means you avoid opening up Photoshop etc. 'Screen' will do the opposite, depleting all of the black as oppose to white.

No comments:
Post a Comment