Indesign - New > Document, it's very rare that you'll ever need to create a book.
Always ask yourself this question before inputting your page size - 'What is the finished, printed, trimmed size of whatever your producing' - Planning is the key.
Columns/ Margins - If you need a consistent white space around your page, e.g. if your working with text or laying out a book. Making it easier to apply your text and images in a consistent form.
Guides - Assisting your layout, applying a consistent guide across all your pages.
Bleed - If you've got anything that fills the page, you should extend the component off the page to avoid a white border. Standard bleed measurement = 3mm
'Slug' defining an area outside of the page...

Facing Pages - Selecting this option means your able to see the on-screen pages as they're going to be when they're finally printed. This allows you to spread information over two pages successfully etc.


Purple line - Margin
Black - Trim
Red - bleed
Blue - Slug area
The pages palette gives you an overview of your document, allowing you to jump straight to certain pages, rather than scrolling.

The default swatch view is already set to small list view. Showing all the required information you need. This means there's no need to change the view list.

To increase the size of your text hold; CMMD / ALT / SHIFT & < >
Select 'Formatting affects texts' then select a colour from your swatches to efficiently apply colour to your text.


Using a spot colour - Use a unique reference number - usually specified by your client, apply this colour to your swatches, and then use it to fill your selection.


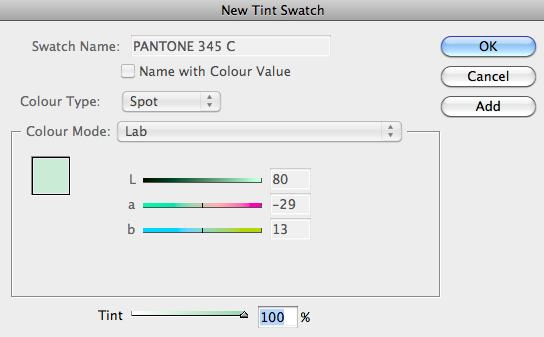

Applying tint follows the same procedure as we've previously been shown in the other workshops.


Photoshop
- CMYK / GREYSCALE
- RESOLUTION / 300 DPI
- MAKE THE IMAGES ACTUAL SIZE (there's no re-sizing in Indesign, making it larger will lower the resolution of the image, lowering the quality of your images. Making your images smaller won't lower the resolution, BUT it could cause problems when it comes to the printer processing this information)
- PSD / TIFF - (If your working with layers in photoshop it allows you to work with transparency, which will pass through onto Indesign, Tiff files do not support transparency.)
Illustrator
- Ai - You can copy & paste directly from Illustrator, as explained later on in this post
- CMYK mode
- Scaling in Indesign from Ai files is enabled due to the files being vectors.
One of the most important things when your designing for print and Indesign is the preparation of your images. Any images your going to use in Indesign, you will need too previously prepare in Illustrator/ Photoshop. Were going to look at what happens to the swatch palette when we apply images.


The spot colours you've used will automatically be placed in your swatch palette along with your imported image. Making it easier to apply the same colours to text etc...

With all images, particularly illustrator files you get a very low resolution preview of the image, however it will still print as sharp as it was on-screen in Illustrator.
** You can copy & Paste, directly from Illustrator into Indesign, with this process your just adding shapes to your Indesign layout, therefore there's no need for a link. The colour palette will still add the Pantones used.


Additional option if your working with a print job that is only using one ink... If you place a greyscale tiff into indesign, you can apply colour through your swatches, its almost like a fake monotone. Only works with greyscale tiff files. (Make sure your grabbing the content of the image, which will thus create a brown box around your content).


Alt + double click - will open the image in the default application, as you can see here the default is 'Preview' which isn't very useful - where going to change this preference by clicking, CMD & i. Bringing up the option for what programme we want to change the preference too.

...


On layers - double click the image and press ok, then select magic wand and delete the white background. When saving make sure your changing the file format to photoshop and that 'Layers' is ticked. This will create a transparent, image based component just as the screenshot below demonstrates. (You will not be able to add colour to this update)


By sending all your other elements to the background, you can see that the process has become successful...

Commercial Print
Spot colours are on their own printing plates, their own positives, printed onto very heavy acetates. It uses a photo emulsion and ultra-violet lights. A printing plate will be made from each positive.
**Useful to check how many positives are going to be outputted.


Low frequency results in very course dots, meaning they'll be quite spaced out and clearly visible.
*If you create halftones in photoshop you have no tint of grey, simply black.
'Knocking out' & 'Overprint' - How the separations work when you have overlapping colours.


Ink Limit - when you exceed the ink limit of 300%, there is a signifier that shows that the process of this ink could be dangerous to the production of your print.


Useful Links
http://help.adobe.com/en_US/indesign/cs/using/WSa285fff53dea4f8617383751001ea8cb3f-7042a.html
The screenshots below just basically demonstrate how the Ink process CMYK work together to produce a photographic image.


Frequency / Spots outputted...

Magnified/ layered 4 colour CMYK...


No comments:
Post a Comment